Stevenson screen
For the past ten days I’ve been collecting data from three sets of temperature sensors located in different places around the yard. There’s the sensor in the Rainwise weather station at the top of the dog yard gate, a collection of sensors out behind the house under the oil tank, and a set of sensors under a collection of yogurt containers on top of a foundation post on the west side of the house.
It’s not easy to get accurate temperature readings. You need to site the sensors where they’ll get a good reading (between 4 and 6 feet off the ground, out in the open and away from buildings and trees), keep the sensors from getting heated by the sun, and keep them dry both from rain and snow, as well as from condensation inside an enclosure. I’ve got the last one figured out, but siting and solar radiation are proving to be big challenges.
The plot below shows the hourly average temperature readings for all three sets of sensors over the last ten days since I added the west sensor.
Temperature sensor comparison
The sensor atop the dog yard gate (the red line) is well sited in terms of it’s distance from large objects like buildings and trees, but it’s too high off the ground. It’s enclosed in a Gill multi-plate radiation shield, which is effective at reducing the effect of solar radiation when the wind is blowing. Compared with other temperature sensors in the region, this sensor is commonly several degrees warmer during the middle of the day, and I think this is because the shield isn’t keeping the sensor cool enough. We do seem to get less wind than in other places, and I think this is why the shield isn’t working as well as it should be. The sensor’s location away from everything does allow it to reach accurate minimum temperatures at night.
The sensor cluster behind the house is effectively shielded from the sun because it’s very close to the north side of the house, and even when the sun is in the north (in Fairbanks, the sun comes pretty close to circling the sky in summer) there are trees behind the house that keep it shaded. But it’s much too close to the house, and the location is far more sheltered than is appropriate. The moderating effect of being so close to the house reduces the diurnal temperature range, clipping the highs and lows compared to the data from the dog yard sensor.
On the west side of the house, I’ve got three sensors sitting on top of a foundation post (a telephone pole driven into the ground). There are several layers of yogurt container on top of the sensors, both to protect them from rain, but also in an attempt to reduce solar heating under the containers. The radiation shielding appears to be almost as effective as the commercial Gill shield over the dog yard sensors (the high temperature peak on the graph is very similar between the two), but something is keeping the temperature from dropping at night. The low temperatures from the west sensors are more than 5 degrees warmer than the dog yard sensor. I suspect the sensors aren’t high enough off the ground, and that the foundation post may be absorbing a lot of heat during the day and keeping the sensors artificially warm at night.
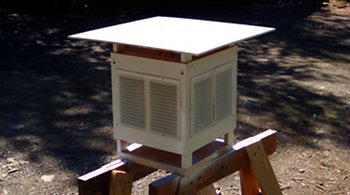
My plan is to place the west sensors inside the Stevenson shield pictured at the top of this post. I’ll raise it to between 4 and 6 feet in the air, and see how the temperatures compare with the dog yard sensors. I’m also working on a solar powered aspiration system in case the Stevenson screen doesn’t have enough of an effect on the high temperatures on sunny days. I haven’t quite worked it out yet, but the idea is to put a small computer fan on the top of a short piece of 4” plastic pipe that contain the sensors. When the sun is shining, the solar panel drives the fan, which pulls air up through the pipe and over the sensors. We’ll see if it’s needed in the next few days.
The Arduino weather station is coming along. Today I integrated a barometric pressure sensor and a calibrated light sensor into the hardware and software. The pressure sensor is a SPC1000-D01, which is sensitive to pressure changes as small as the difference within a 9 cm column of air. It can be used in several different configurations depending on how often you want to get a reading, and how much precision it reports. At the best frequency and precision, the sensor was drawing enough current that I was having trouble adding other sensors to the Arduino, so I’m running it in it’s lowest power configuration (where the chip is in a low power standby mode until you ask it for a reading). The light sensor is a TSL230R, which is also very accurate. It has three different sensitivity levels that can be changed at any time, which means that when the light intensity gets too high or low, the Arduino changes the sensitivity of the sensor to keep the results within range. The only down side to these chips are they require a lot of digital pins (four for the pressure sensor, five for the light sensor).
Here’s a circuit diagram of the current setup. If you click the image, you can view a PDF version. There’s also an Arduino xcircuit diagram. This is the first circuit I’ve ever tried to draw, so it probably isn’t as well laid-out at it should be.
The code is also available. It’s not pretty, but it works. If you do download it, the code include a simple analog light sensor (light0), which isn’t shown on the wiring diagram. I was using it before I got the new sensor set up, and haven’t removed it from the hardware yet.

Arduino setup
My Arduino-based weather station has improved in the last week to the point where it’s delivering useful data. I’ve got five DS18B20 temperature sensors hooked up and reporting their temperatures to my Goldstream Creek Weather Pages. In the image on the top of the post, the Arduino is on the left, the indoor sensors are in the middle, and the outdoor cluster of temperature sensors is on the right (under a yogurt container). At the moment, I’m just averaging the data from the two sensors that are inside and the three outside, but eventually I’d like to place each sensor in a different location. I’m not sure where the outdoor sensors will go, but one of the indoor sensors will move up to the second floor of the house. Twisted-pair telephone cables carry the data and power to the sensor clusters.
I’ve also connected a cheap photoresistor to the sensor cluster in the house. I’m converting the resistance it reports to a value from 0 (dark) to 100 (light). It’s in a place that rarely gets direct sunlight, so the values should give some idea of when the sun is up, and whether it’s sunny or cloudy. I have a more sophisticated light sensor (TSL203R) and a barometric pressure sensor (SCP1000), but haven’t tried them yet. I’ve run out of breadboards, and now that my Arduino is actively delivering data, I’m a bit less inclined to experiment.
I think it’ll be interesting to compare the outdoor temperatures from behind the house with the temperature coming from the Rainwise weather station atop the dog yard gate. Also, there ought to be an obvious relationship between outdoor temperature, light, and indoor temperature, since it seems like the house heats up much more quickly when the sun is beating on the south facing side. If I was really ambitious, the windows and window-shades could be connected to the system: it’d open the windows when it detected cooler temperatures outside than inside, and close the shades in whichever window is getting direct sunlight.
Once the design and software has stabilized, I’ll be sure to post the schematics and code.

Arduino and prototyping shield
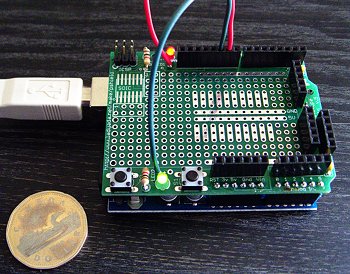
Yesterday, my Arduino board showed up in the mail. It’s pictured in the photo alongside a Canadian dollar from when I drove up to Alaska. I ordered it with a prototyping shield and Getting Started with Arduino, a book written by one of the developers of the Arduino platform. The book is a great introduction to the hardware and the software you use to control the gadget. To fully appreciate the book, you’ll want to get a few extra extra components so you can try the experiments in the book. These include a breadboard, solid core wire for the breadboard, a button, light sensor, LEDs, and a variety pack of resistors.
What is it? It’s a very simple computer connected to fourteen digital input / output pins, six analog input / output pins, and a USB communication system so you can read data and put programs on the system. In other words, you can read data from the environment, control things based on that data, and send data back to a computer all on the same small board. I’m interested in using the platform to build my own weather station to complement the professional station we have. But more generically what’s cool about it is that it provides an inexpensive (my board was $35) platform for “programming” the world. Instead of buying a gadget off the shelf that someone else has built to perform a task they think you’ll want, you can build something to do exactly what you want.
In the real world.
All I’ve done with it so far is to control the flashing of the pair of LEDs that came with the prototyping shield. I know that doesn’t sound very exciting, but if you can control LEDs and make them go on and off, or vary their intensity, that means you can control anything that takes an on / off, or variable input. For example, a set of fans in your house whose speed and direction is controlled by the relationship between the temperature in the house, in the attic, and outside. Or controlling a sprinkler system that senses how wet the ground is, reads the weather forecast from the Weather Service and only turns on the sprinklers if no rain is expected. Or a system that operates a dog door, sensing which dog has approached by reading an RFID tag on their collar and then opening or locking the door depending on whether they are allowed in or out.
You get the idea. Combining any of the wide variety of input sensors available with the ability to do things based on logic that you control is a really powerful tool. And the low cost of the board makes it reasonable to experiment and try things out until you get a system working the way you want.
My initial project will include a series of temperature sensors that I’ll put in different places in the house and outside (maybe even in a dog house?), a light sensor and a barometric pressure sensor. Of course, you can buy small weather stations that have all of these things in them, but most can’t read temperatures below -40°F, and most only have one sensor. Best of all, I’ll plug mine into a “real” computer via USB and record the data as it comes in.
