![[ Swingley Development ]](../images/title.png)
![[ Jump to Content ]](../images/blank_white.png)
Our House -- August 2001
The following pictures show some of the work we've been doing around our house this spring. All photos were taken in May - August 2001. If you'd like to see some more photos, this page has some photos from April 2001, this page has some photos from May 2000, this page has some photos from January 2000, this page has some photos from December 1999, and this page has some older shots from May 1999 before we moved in. Most photographs on this page are Copyright © 2001, Chris Swingley. All photos with me in them are Copyright © 2001, Andrea Swingley.
Each of the photographs are between 5 - 10 K, so the page will load slowly over a modem link.
Index of pages About Me:
Installing Siding
 Now that the windows are in, it's time to put siding on the house to
cover the painted plywood exterior that we've currently got. When we
bought the house, we almost lost our loan because the bank wanted
us to put T-111 over the existing plywood "siding." Luckily they
relented, and we were able to spend our money on good siding instead
of T-111 plywood.
Now that the windows are in, it's time to put siding on the house to
cover the painted plywood exterior that we've currently got. When we
bought the house, we almost lost our loan because the bank wanted
us to put T-111 over the existing plywood "siding." Luckily they
relented, and we were able to spend our money on good siding instead
of T-111 plywood.
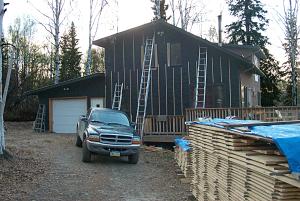 We ordered
8 inch bevel siding, and 4 inch trim boards made of local (Cache
Creek) White Spruce from Alaskan Birchworks. Bob Zachel is a good
guy to deal with, and he gives you a good, locally produced product.
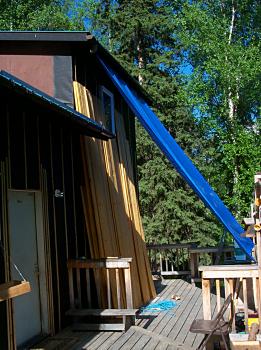
You can see the stuff drying in the photo.
We ordered
8 inch bevel siding, and 4 inch trim boards made of local (Cache
Creek) White Spruce from Alaskan Birchworks. Bob Zachel is a good
guy to deal with, and he gives you a good, locally produced product.
You can see the stuff drying in the photo.
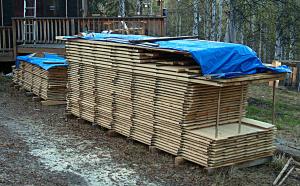
 (may 22)
I decided to install the siding to last, using 15 pound tar paper
over the sheathing and an air space behind the siding created with
lathe so that any moisture that gets behind the siding can escape
without wicking into the siding or the walls. We'll be finishing
the siding in a dip tank, so all six sides will be protected before
installation.
(may 22)
I decided to install the siding to last, using 15 pound tar paper
over the sheathing and an air space behind the siding created with
lathe so that any moisture that gets behind the siding can escape
without wicking into the siding or the walls. We'll be finishing
the siding in a dip tank, so all six sides will be protected before
installation.
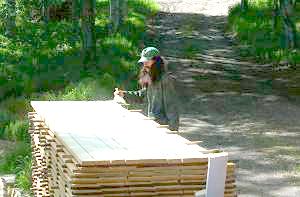
 (june 11) The siding
air dried in our driveway for four weeks, and is dry enough to stain
and install on the house. The first step in the dipping process is
to brush all the sawdust off the wood. It's probably not necessary,
but at $20.00 / gallon I don't want to be paying to stain sawdust.
(june 11) The siding
air dried in our driveway for four weeks, and is dry enough to stain
and install on the house. The first step in the dipping process is
to brush all the sawdust off the wood. It's probably not necessary,
but at $20.00 / gallon I don't want to be paying to stain sawdust.
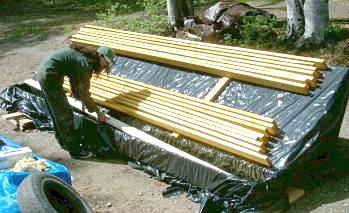
 Here I'm dipping
a piece of trim into the tank. True to it's name, the White
spruce wood is really bright white before dipping. We chose Superdeck
Exterior Transparent Stain in "Natural". It's a lot yellower than I
had expected (as you can see from the trim boards on the drip rack),
but as it ages it will darken and lose some of the yellowish tinge.
Here I'm dipping
a piece of trim into the tank. True to it's name, the White
spruce wood is really bright white before dipping. We chose Superdeck
Exterior Transparent Stain in "Natural". It's a lot yellower than I
had expected (as you can see from the trim boards on the drip rack),
but as it ages it will darken and lose some of the yellowish tinge.
While the board is sitting in the stain, each board on the drip rack needs to be flipped over and moved up the rack. Flipping the board allows me to wipe off the excess stain (from when that corner was oriented downward), and it helps to redistribute any remaining excess so I don't wind up with a tacky section.
 When the drip rack
is filled, the top board is fairly dry, so it can be moved to the
side of the house to dry the rest of the way. I nailed the edge of a
large tarp to the underside of the roof and made a big tent over the
drying siding. After 24 hours, I can re-stack the trim and siding
in anticipation of hanging it. It took about two weekends of solid
work to stain all of the siding and trim for the house.
When the drip rack
is filled, the top board is fairly dry, so it can be moved to the
side of the house to dry the rest of the way. I nailed the edge of a
large tarp to the underside of the roof and made a big tent over the
drying siding. After 24 hours, I can re-stack the trim and siding
in anticipation of hanging it. It took about two weekends of solid
work to stain all of the siding and trim for the house.
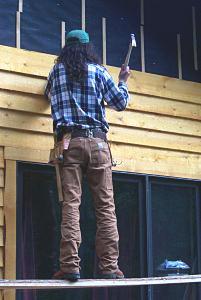
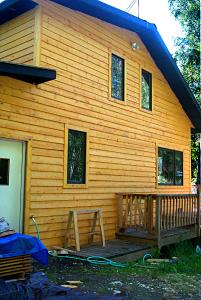
(july 2) The north side of the house is finished (except for the garage, and am about a third of the way up the west side. The north side is visible from the road, and the west side of the house is the side that visitors approach from. At this point I've gotten above my head, so a temporary scaffold is necessary to continue. I should be able to get to the bottoms of the upper windows with this scaffold, at which point I'll have to build a taller one.
 (july 8) A shot near the
limit of my range for the lower scaffold. This lower scaffold is
two extra pieces of spruce left over from cutting the siding, bolted
together and resting on three ladders.
(july 8) A shot near the
limit of my range for the lower scaffold. This lower scaffold is
two extra pieces of spruce left over from cutting the siding, bolted
together and resting on three ladders.
 The siding is 8
inches wide, but I'm overlapping it by 2 inches to allow for expansion
and contraction with the weather. Butt joints are cut at an angle
so that any expansion and contraction in the long dimension won't
open up a black gap to the tar paper beneath.
The siding is 8
inches wide, but I'm overlapping it by 2 inches to allow for expansion
and contraction with the weather. Butt joints are cut at an angle
so that any expansion and contraction in the long dimension won't
open up a black gap to the tar paper beneath.
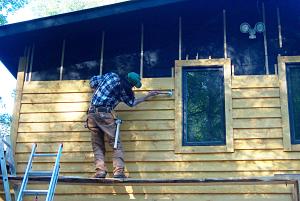
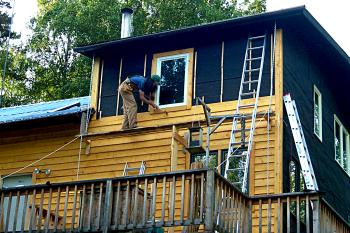 (aug 8) Here I'm up
on my new, improved scaffold working on the south side of the house.
The scaffold is a spruce off-cut that is suspended from the roof
trusses by a set of eye bolts and thick chain. Each side is tied to
bolts driven into the side of the house so that the platform won't
move from side to side or in and out. I also have a bumper which
prevents the scaffold from swinging into the house. It's very secure,
but a little shaky so good balance is important.
(aug 8) Here I'm up
on my new, improved scaffold working on the south side of the house.
The scaffold is a spruce off-cut that is suspended from the roof
trusses by a set of eye bolts and thick chain. Each side is tied to
bolts driven into the side of the house so that the platform won't
move from side to side or in and out. I also have a bumper which
prevents the scaffold from swinging into the house. It's very secure,
but a little shaky so good balance is important.
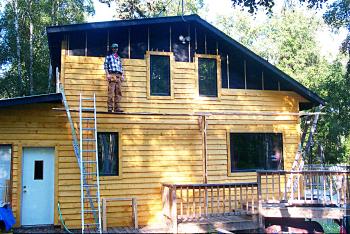
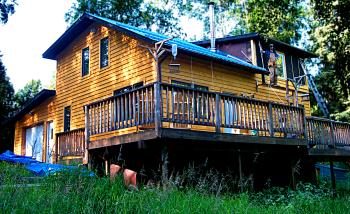 Getting close to finishing the south side. I've got a few more courses
next to the guest bedroom window, and then the small triangular section
near the wood stove chimney and I'll have all but the east side of the house
and the garage done!
Getting close to finishing the south side. I've got a few more courses
next to the guest bedroom window, and then the small triangular section
near the wood stove chimney and I'll have all but the east side of the house
and the garage done!