![[ Swingley Development ]](../images/title.png)
![[ Jump to Content ]](../images/blank_white.png)
Alaska Bird Observatory Shelves
The following pages show how I built the shelves for the Alaska Bird Observatory. A set of plans (PDF format, 85 KB) are available for this project.
Other Woodworking pages:
| Projects | Plans | Tools | OldTools Archive |
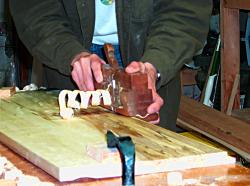
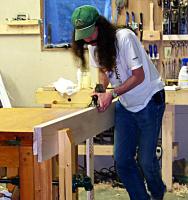 The project starts by turning narrow boards
into boards that are the full width (12 inches) of the case.
The first step in this process is to match two boards of sufficient
width with the grain going in the same direction. Fold the boards
along the joint, clamp them together and joint the edges straight.
Because you are planing both boards at the same time, the plane has
a wider surface to ride on, and even if the edge isn't perfectly
perpendicular to the faces, the error will be cancelled out when
the boards are opened up to close the joint. I'm using a Stanley
#7 jointer plane in this picture.
The project starts by turning narrow boards
into boards that are the full width (12 inches) of the case.
The first step in this process is to match two boards of sufficient
width with the grain going in the same direction. Fold the boards
along the joint, clamp them together and joint the edges straight.
Because you are planing both boards at the same time, the plane has
a wider surface to ride on, and even if the edge isn't perfectly
perpendicular to the faces, the error will be cancelled out when
the boards are opened up to close the joint. I'm using a Stanley
#7 jointer plane in this picture.
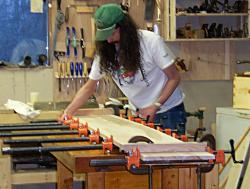 The image
on the left show the setup I use to glue the boards together.
I start by putting a bead of glue on both edges, and then run a
stick across the bead to spread the glue over the entire edge.
The edges are then pressed together into the clamps. A pair of
cauls, wrapped in plastic and held by two C-clamps, are clamped
over the ends keep the edges of the boards in same plane. You can
see these in the foreground of the photo.
The image
on the left show the setup I use to glue the boards together.
I start by putting a bead of glue on both edges, and then run a
stick across the bead to spread the glue over the entire edge.
The edges are then pressed together into the clamps. A pair of
cauls, wrapped in plastic and held by two C-clamps, are clamped
over the ends keep the edges of the boards in same plane. You can
see these in the foreground of the photo.
 Once the glue
dries the wide boards need to be squared and smoothed. The first
step is to straighten one of the long edges using a long jointer
plane. If the outer edges are really wavy, you may need to use a
more aggressive plane to remove the high spots, or even strike a
straight line on the board and cut the excess off with a rip saw.
Once the glue
dries the wide boards need to be squared and smoothed. The first
step is to straighten one of the long edges using a long jointer
plane. If the outer edges are really wavy, you may need to use a
more aggressive plane to remove the high spots, or even strike a
straight line on the board and cut the excess off with a rip saw.
Once one edge is straight, use a panel gauge to mark a straight line on the other side. Rip off the excess and plane this edge flat with a jointer plane. At this point you'll have a board whose edges are square and straight.
 Before cutting the boards
to length, the boards need to be planed smooth. At thing point you're
not looking for a perfect surface, but it needs to be close to the
final thickness so that you can cut the joinery. After the sawing and
chopping is finished, the boards will get their final smoothing.
Before cutting the boards
to length, the boards need to be planed smooth. At thing point you're
not looking for a perfect surface, but it needs to be close to the
final thickness so that you can cut the joinery. After the sawing and
chopping is finished, the boards will get their final smoothing.
I used a jack plane to bring the two boards to the same level, followed this with a #3 smoothing plane to improve the surface, and finished with a #80 cabinet scraper. On areas with especially tough grain, or deep gouge marks, I used a hand scraper to remove the damage. The boards will be smoothed again before assembly and finishing, so it's not critical to get them perfect.
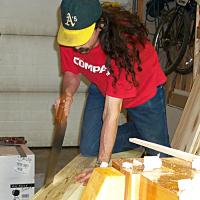
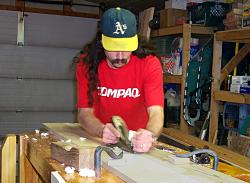
 These photos show the way
I hold the long boards on the bench. A couple hand forged hold
fasts pounded into holes bored in the bench hold the far end of
the board. I plane toward the hold fasts, making sure that when
I extend my arms I won't hit them. These hold fasts were forged
by fellow Alaskan galoot Phil Koontz in Galena. Thanks Phil!
These photos show the way
I hold the long boards on the bench. A couple hand forged hold
fasts pounded into holes bored in the bench hold the far end of
the board. I plane toward the hold fasts, making sure that when
I extend my arms I won't hit them. These hold fasts were forged
by fellow Alaskan galoot Phil Koontz in Galena. Thanks Phil!
Once the pieces are flat and reasonably smooth, choose the best faces and mark the location for the rabbets that will hold the ship-lapped back. Here I'm using a wooden moving filletster plane to plow the rabbet in the back of this top piece. A Stanley #78 also works.
 The middle fixed shelves are held in place with a sliding dovetail
joint. On a very tall case like this, the fixed shelf will help keep
the sides together so the adjustable shelves will say seated. Each side
of the case gets what is basically a dado that is splayed out to house
the end of the shelf.
The middle fixed shelves are held in place with a sliding dovetail
joint. On a very tall case like this, the fixed shelf will help keep
the sides together so the adjustable shelves will say seated. Each side
of the case gets what is basically a dado that is splayed out to house
the end of the shelf.
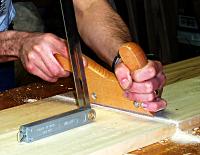
The female half of the joint is cut using hand saws, chisels, and a router plane to remove the waste between the saw cuts. The edes of the slot are cut with a crosscut backsaw, or a stair saw like I'm using in the image on the left. A bevel gauge at the appropriate angle keeps the saw oriented properly.
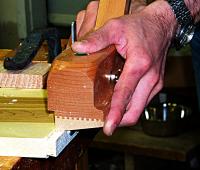 The easiest way to cut the male end of the joint it to use a specially
designed dovetail plane like I'm using here. I use a mortise gauge to
mark the thickness of the widest part of the tail on the end of the board,
and then plane down to these lines with the dovetail plane. My dovetail
plane also has a nicker to cut the wood fibers at the shoulder, but it
doesn't work as well as simply striking the edge with a wheel marking
gauge before using the dovetail plane.
The easiest way to cut the male end of the joint it to use a specially
designed dovetail plane like I'm using here. I use a mortise gauge to
mark the thickness of the widest part of the tail on the end of the board,
and then plane down to these lines with the dovetail plane. My dovetail
plane also has a nicker to cut the wood fibers at the shoulder, but it
doesn't work as well as simply striking the edge with a wheel marking
gauge before using the dovetail plane.
Check the fit between the pieces frequently as you form the male end of the joint. If it is too tight you could break out the wood inside the case, and if it's too loose, the shelf can pull away from the sides of the case.
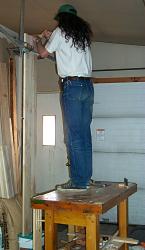 When building a case that is as tall as this one, it is difficult to cut
the pins on the ends of the side pieces. Potential options include
boring a hole in the floor and cutting the pins on the second floor of
your shop (people who do this all the time actually do it this way!),
clamp the sides to a deck railing where the end can hang down, or clamp
the side to the top of your bench and saw upwards while lying on your
back under the joint. I chose to do it by clamping it to the garage
door support rails, and stood on my workbench to get up to the top.
When building a case that is as tall as this one, it is difficult to cut
the pins on the ends of the side pieces. Potential options include
boring a hole in the floor and cutting the pins on the second floor of
your shop (people who do this all the time actually do it this way!),
clamp the sides to a deck railing where the end can hang down, or clamp
the side to the top of your bench and saw upwards while lying on your
back under the joint. I chose to do it by clamping it to the garage
door support rails, and stood on my workbench to get up to the top.
This is as good a point as any to drill the holes in the sides for the adjustable shelves. While one person is chiseling out the waste between the dovetail pins, another person can be drilling holes. I used a plexiglass jig made by Rockler, and drilled the holes with a special spring-loaded bit that drills the proper hole. The drilling is the only part of this project that was done with electricity.
Meanwhile, chisel out the waste between the pins at the top and bottom of each side piece. Once the waste is removed, line up the appropriate side and top or bottom piece and mark the tails from the pins. I use a pair of cheap miter clamps to hold the two pieces together at 90 degrees while I mark them. Getting accurate lines when transerring the pins to the tails (or the reverse) is one of the keys to getting good fitting dovetails.