![[ Swingley Development ]](../images/title.png)
![[ Jump to Content ]](../images/blank_white.png)
Projects
On this page you'll find pictures of my recent projects. I have free plans for some of these projects on the plans page.
A summary list of all the project web pages and plan documents is at the end of this page.
other woodworking pages:
| plans | tools | oldtools archive |
Display Cabinet
 My next project
will be a small display cabinet we can hang on the wall to display small
items like my wife's musk ox collection, or the various animal skulls I've
collected over the years. The project is inspired by a display cabinet in
James Krenov's A Cabinetmaker's Notebook, pages 78 - 81 (the photo
on page 78 is pictured on the right). I've decided to use through
dovetails to join the top and bottom to the sides, and I'll probably use
wood for the shelves, but the dimensions and look to the piece will be
similar.
My next project
will be a small display cabinet we can hang on the wall to display small
items like my wife's musk ox collection, or the various animal skulls I've
collected over the years. The project is inspired by a display cabinet in
James Krenov's A Cabinetmaker's Notebook, pages 78 - 81 (the photo
on page 78 is pictured on the right). I've decided to use through
dovetails to join the top and bottom to the sides, and I'll probably use
wood for the shelves, but the dimensions and look to the piece will be
similar.
The project only uses about 10 board feet of wood, so I'll probably use a wood I've never used before. I haven't started building the project yet, but have developed a set of version 0.1 plans (PDF format, 147 Kb). There's also a web page showing my progress on the project, but since I haven't started it, this is just a place holder until I get started.
DVD Cabinet
 After remodeling our living room
we needed a better place to store our DVD's. It's a slightly larger
version (42 inches x 26 inches x 9 inches) of Michael Dunbar's Colonial
Cupboard hand tool project from Fine Woodworking, Number 151 (October 2001),
pages 64-71. The case is a dovetailed box with a mortise and tenon face
frame and door. Shelves are set into dadoes in the sides and the back is
formed from tongue and grooved boards.
After remodeling our living room
we needed a better place to store our DVD's. It's a slightly larger
version (42 inches x 26 inches x 9 inches) of Michael Dunbar's Colonial
Cupboard hand tool project from Fine Woodworking, Number 151 (October 2001),
pages 64-71. The case is a dovetailed box with a mortise and tenon face
frame and door. Shelves are set into dadoes in the sides and the back is
formed from tongue and grooved boards.
The image on the right shows the finished project. I'm very happy with the project, but if I was making it over again, I'd make the face frame thinner. The face frame, which is two and a half inches wide, could probably be a closer to an inch and a half, reducing the less usable space at the ends of each shelf.
I have a web page that shows my progress on this project, and am working on a set of plans (PDF format, 124 Kb) for download. At this point the plans include measured drawings and a cut list, but I still need to work on the construction details.
Writing Table
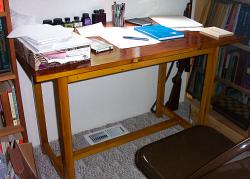 This project is the hand
tools version of the Monestary Table Norm Abrams built in the 2003 season
of The New Yankee Workshop. It can be used as a small kitchen
table, a writing table, or as a place to pay bills. The size can be
customized to fit anywhere you like, but my version is about 28 1/2 inches
tall and the top is 43 inches by 24 inches. It's a nice project because
it's simple and can be finished quickly with a minimum of materials and
tools. Construction is entirely mortise and tenon joinery, with through
tenons used for the foot rail. I built mine from rough cut white spruce
slabs left over from the milling of our
spruce siding.
The table is finished with dewaxed garnet shellac.
This project is the hand
tools version of the Monestary Table Norm Abrams built in the 2003 season
of The New Yankee Workshop. It can be used as a small kitchen
table, a writing table, or as a place to pay bills. The size can be
customized to fit anywhere you like, but my version is about 28 1/2 inches
tall and the top is 43 inches by 24 inches. It's a nice project because
it's simple and can be finished quickly with a minimum of materials and
tools. Construction is entirely mortise and tenon joinery, with through
tenons used for the foot rail. I built mine from rough cut white spruce
slabs left over from the milling of our
spruce siding.
The table is finished with dewaxed garnet shellac.
I am working on a set of plans (PDF format, 66 Kb) for download. At this point the plans include measured drawings and a cut list, but I still need to work on the construction details.
Alaska Bird Observatory Shelves
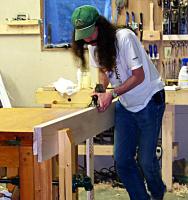 These are a set of bookshelves I'm building for the Alaska
Bird Observatory. They're approximately seven feet tall and
nine feet long. The shelves are build from three seperate,
dovetailed boxes which are joined together and rest on a base.
One of the shelves is fixed and the rest are adjustable on holes
drilled into the sides. A baseboard molding hides the bottom
support, a crown molding dresses up the top of the case, and
vertical moldings hide the joints between the shelf cases.
These are a set of bookshelves I'm building for the Alaska
Bird Observatory. They're approximately seven feet tall and
nine feet long. The shelves are build from three seperate,
dovetailed boxes which are joined together and rest on a base.
One of the shelves is fixed and the rest are adjustable on holes
drilled into the sides. A baseboard molding hides the bottom
support, a crown molding dresses up the top of the case, and
vertical moldings hide the joints between the shelf cases.
The image on the right shows me edge jointing narrow boards into full width boards. I have a web page showing my progress, as well as a set of plans (PDF format, 85 Kb) for download.
Medium Height Pine Shelves
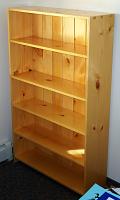 Here's a great project
that'll really exercise your woodworking abilities -- a set of medium
height bookshelves held together with dovetails. It's also fairly
inexpensive -- I used seven, eight foot pieces of 1 x 12 from the local
lumber yard, which cost just under $80 here in Fairbanks.
Here's a great project
that'll really exercise your woodworking abilities -- a set of medium
height bookshelves held together with dovetails. It's also fairly
inexpensive -- I used seven, eight foot pieces of 1 x 12 from the local
lumber yard, which cost just under $80 here in Fairbanks.
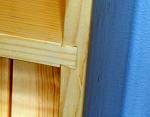 The image on
the right shows the finished shelves. They were finished
with two coats of orange shellac, followed by four coats of
blonde shellac. Paste wax is the final coat. The image on
the left shows the sliding dovetail joint. I am developing plans (PDF format)
for this project.
The image on
the right shows the finished shelves. They were finished
with two coats of orange shellac, followed by four coats of
blonde shellac. Paste wax is the final coat. The image on
the left shows the sliding dovetail joint. I am developing plans (PDF format)
for this project.
This project also allows for a lot of customizations. If you wanted adjustable shelves, only the top and bottom shelves need to be fixed and the remaining shelves could be supported by shelf pins. The case can be dressed up with a face frame, crown molding and a floor molding that hides the space at the bottom of the shelves. A cabinet could also be added to the bottom of the case by adding a center partition, fixing the bottom two shelves, and installing door to the face frame. All in all, a very versatile project.
Chair from a 2 X 4
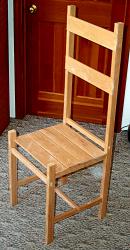 A post on the OldTools list,
in combination with the grand opening of Fairbanks' very own Borg
(the bright orange box that assimilates hardware stores) got me
thinking about building my own chair from a single eight foot 2
x 4. I'd never built a chair before, so I figured I'd give it
a go.
A post on the OldTools list,
in combination with the grand opening of Fairbanks' very own Borg
(the bright orange box that assimilates hardware stores) got me
thinking about building my own chair from a single eight foot 2
x 4. I'd never built a chair before, so I figured I'd give it
a go.
You should try to figure out how to cut the lumber on your own, but if you want to see how I did it, you can download a PDF image (2 KB) of my cut lines. I made several attempts on paper before I came up with this design.
It took me about six hours to rip all of the lumber to size, cut the mortise and tenon joinery, and plane the pieces reasonably flat and smooth. Assembly took another hour or so. I haven't finished the piece yet, but I'll probably use some orange shellac, or the three-in-one finish (linseed oil, varnish, turpentine).
It's not the most comfortable chair in the world, and it makes some unusual cracking noises when I lean back onto the back legs (a habit that always used to get me in trouble in school), but so far it's stayed together.
Shaker Sewing Steps
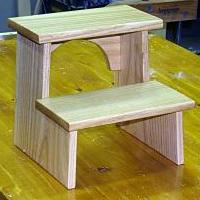 The inspiration for
this project comes from the ``Sewing Steps'' shown on page 142 of
Christian Becksvoort's The Shaker Legacy, Perspectives on an
Enduring Furniture Style. Sewing steps provide a foot-rest
for someone sewing by hand in a seated position. It's also an
easy project that uses less than 2 board feet of hardwood.
The inspiration for
this project comes from the ``Sewing Steps'' shown on page 142 of
Christian Becksvoort's The Shaker Legacy, Perspectives on an
Enduring Furniture Style. Sewing steps provide a foot-rest
for someone sewing by hand in a seated position. It's also an
easy project that uses less than 2 board feet of hardwood.
I have a set of plans (PDF format, 78 KB), and a web page that details the construction process.
Magazine Cabinet
![[ Magazine Cabinet ]](images/mag_cab/mag_cab_feb_02.jpg) These
plans are heavily based on an article that appears in Fine
Woodworking, Issue 148, pages 108-113. If you want more
details than appear here, or want to see another (power tool
oriented) method for building a magazine cabinet, please consult
the magazine.
These
plans are heavily based on an article that appears in Fine
Woodworking, Issue 148, pages 108-113. If you want more
details than appear here, or want to see another (power tool
oriented) method for building a magazine cabinet, please consult
the magazine.
The cabinet is approximately 24 inches wide, 12 inches deep, 30 inches tall and has a single shelf centered inside. The main carcase is built from solid oak dovetailed together on the top and bottom, with the back assembly and the two doors built with with frame and panel joinery. The middle shelf fits into a sliding dovetail in the carcase sides, and the back assembly fits into a dado that runs around the inside of the cabinet.
I have a set of plans (PDF format, 111 KB), and a set of web pages that detail the construction process.
Cheap, Sturdy Workbench
![[ workbench progress ]](images/new_workbench/workbench_apr_02.jpg) I based these
plans loosly on the Roubo workbench that appears in The
Workbench Book by Scott Landis. It's basically a sturdy
table with a thich top that uses timber frame joinery in it's
construction. My version is built using construction grade lumber
(2 x 6, 4 x 4 pine or fir).
I based these
plans loosly on the Roubo workbench that appears in The
Workbench Book by Scott Landis. It's basically a sturdy
table with a thich top that uses timber frame joinery in it's
construction. My version is built using construction grade lumber
(2 x 6, 4 x 4 pine or fir).
The design allows for a lot of customizations depending on what you want to do with the bench. Since I already have a bench with an end vise and a twin screw vise, I will customize mine with a thick leg vise, bench hooks, a couple planing stops, and holes for iron holdfasts. This is basically the setup shown in The Workbench Book, except the construction details are a bit different (who has a 5" thick slab of hardwood anyway?).
If you'd like to see some rough plans for this project, click on this link: PDF format plans (80 KB). You'll need a PDF viewer to view / print this file.
Sawbench
![[ sawbench ]](images/sawbench/sawbench_upper_left.jpg) If you're going to use hand tools to dimension rough stock, you'll
need a sturdy sawbench to attach lumber to while sawing it.
I build my sawbench after seeing several versions that other
OldTools members had built.
If you're going to use hand tools to dimension rough stock, you'll
need a sturdy sawbench to attach lumber to while sawing it.
I build my sawbench after seeing several versions that other
OldTools members had built.
My version is built from 30 pieces of pine recovered from a shipping crate. I started by ripping several pieces of the 3/4 inch-thick material into lengths longer than I would need. These were edge jointed and then glued together to form larger boards. The larger composite boards are flattened and then laminated together to form large 1 1/2 inch thick planks. Finally, these planks were sawed to shape, and planed down to the marking lines.
![[ wood stack ]](images/sawbench/sawbench_right.jpg) On the right
is another picture of the right side of the bench. If you
look carefully at the end grain in the picture on the right,
you can see all the different pieces used to form the back and
the middle stretcher. The top is fastened to the sides using
through mortises with small wedges hammered in place, and the
stretcher is affixed to the sides with a large through mortise
and a birch peg. No nails or glue was required. The finish
is a coat of boiled linseed oil followed by several coats of
dewaxed blond shellac.
On the right
is another picture of the right side of the bench. If you
look carefully at the end grain in the picture on the right,
you can see all the different pieces used to form the back and
the middle stretcher. The top is fastened to the sides using
through mortises with small wedges hammered in place, and the
stretcher is affixed to the sides with a large through mortise
and a birch peg. No nails or glue was required. The finish
is a coat of boiled linseed oil followed by several coats of
dewaxed blond shellac.
If you'd like to see some rough plans for this project, click on this link:PDF format plans (3 KB). You'll need a PDF viewer to view / print this file.
Krenov-Style Wall Hung Shelves
![[ Krenov-style shelves ]](images/shelves/small_left_side.jpg) I'm virtually finished with this project (I still need to build
a little drawer that fits into the compartment below the right side
of the book shelf). It was a great project that really exercised
my woodworking skills without using
a lot of wood. The plans were inspired by the shelves shown in
James Krenov's A Cabinetmaker's Notebook (page 37 of my
copy) and The Fine Art of Cabinetmaking (near the end).
I made mine from Alaskan birch, but you could make it from almost
any other wood, or add some detail work in another wood (I contemplated
purpleheart edges, but decided I'd better make one successfully before
I did anything more complex). At the end of this section you can jump to
a page detailing my construction of this project.
I'm virtually finished with this project (I still need to build
a little drawer that fits into the compartment below the right side
of the book shelf). It was a great project that really exercised
my woodworking skills without using
a lot of wood. The plans were inspired by the shelves shown in
James Krenov's A Cabinetmaker's Notebook (page 37 of my
copy) and The Fine Art of Cabinetmaking (near the end).
I made mine from Alaskan birch, but you could make it from almost
any other wood, or add some detail work in another wood (I contemplated
purpleheart edges, but decided I'd better make one successfully before
I did anything more complex). At the end of this section you can jump to
a page detailing my construction of this project.
The plans call for about 6 board feet of wood, and the final dimensions are 8 inches deep, 21 1/4 inches wide and 13 inches tall. There is a single shelf that is 8 1/4 inches tall, and a narrow shelf at the bottom with a small drawer on the right hand side.
I have PDF format plans (70 KB) for this project. You'll need a PDF viewer to view / print this file.
See me building this project step by step
Adirondack Chair
![[ adirondack chair prototype ]](images/adirondack/proto_adirondack.jpg) This is the classic
deck chair, built based on an article in Fine Woodworking.
I built the prototype from 4/4 pine, filled in the screw holes
with wooden dowels and painted the chair with an outdoor paint.
This is the classic
deck chair, built based on an article in Fine Woodworking.
I built the prototype from 4/4 pine, filled in the screw holes
with wooden dowels and painted the chair with an outdoor paint.
The first image on the right shows the prototype, built from 4/4 pine. It's a very comfortable chair and has plenty of armrest surface for a cup of coffee or a glass of iced tea in the summer. I've tested it on short and tall people and everyone agreed that the depth of the seat and the angle of the back are just about right.
![[ birch adirondack chair ]](images/adirondack/birch_adirondack.jpg) The image on the left
is the final production version of the chair, with only a spit
coat of varnish on it. It has a much more refined look because I
used thinner members for all the parts in the chair (4/4 planed
smooth to about 11/16", and each member isn't as wide as in the
prototype). The back slats also show off the beautiful patterns
you find in Alaskan birch. I also decided to reduce the angle of
the first seat slat to lessen the chance that the front edge of
the chair would cut off circulation in a shorter person's legs.
Now all I have to do is finish varnishing it. . . .
The image on the left
is the final production version of the chair, with only a spit
coat of varnish on it. It has a much more refined look because I
used thinner members for all the parts in the chair (4/4 planed
smooth to about 11/16", and each member isn't as wide as in the
prototype). The back slats also show off the beautiful patterns
you find in Alaskan birch. I also decided to reduce the angle of
the first seat slat to lessen the chance that the front edge of
the chair would cut off circulation in a shorter person's legs.
Now all I have to do is finish varnishing it. . . .
Bedside Table
![[ end table ]](images/end_table/end_table.jpg) Here's a really simple table that sits next to the bed in
our guest bedroom. It's made from Alaskan birch. The support
for the table top is built from stretchers that are connected
to the legs using dowels. The top is made from three pieces of
birch, dowelled and edge-glued together with breadboard ends
covering the end grain. The breadboards have a 3/4 inch tongue
that fits into a groove in the table top, and is pegged through
the table and the tongue. The finish is orange dewaxed shellac
with a thin layer of paste wax on the surface.
Here's a really simple table that sits next to the bed in
our guest bedroom. It's made from Alaskan birch. The support
for the table top is built from stretchers that are connected
to the legs using dowels. The top is made from three pieces of
birch, dowelled and edge-glued together with breadboard ends
covering the end grain. The breadboards have a 3/4 inch tongue
that fits into a groove in the table top, and is pegged through
the table and the tongue. The finish is orange dewaxed shellac
with a thin layer of paste wax on the surface.
Here's a picture of the end table in it's final destination. I built it specifically for this location, so it fits perfectly next to the bed. I did make one mistake -- the legs have two tapers cut on the inside sides of the leg. As it turns out, you have to plan these cuts carefully or you'll wind up with a leg or two that has the taper in the wrong direction! The taper is gentle enough that my mistake isn't obvious, but the right rear leg has the taper on the outside faces instead of the inside. Oops!
![[ end table closeup ]](images/end_table/table_close_up.jpg) This
is a close up of the table top joinery. I built the table
in the spring and this shot was taken after a month and a half
of rainy days (August and September) -- the expansion of the
tabletop is clearly visible where the breadboard meets the top.
Luckily I had planned for this expansion by cutting slots instead
of holes in the tabletop where the outside dowel pins go through
the breadboard and tabletop. The tabletop is also secured to the
base using clips that ride in a groove cut in the stretchers --
as the table expands and contracts, the clips move in and out
of the groove but maintain a good connection between the top
and the base. Notice the fine sheen from the shellac.
This
is a close up of the table top joinery. I built the table
in the spring and this shot was taken after a month and a half
of rainy days (August and September) -- the expansion of the
tabletop is clearly visible where the breadboard meets the top.
Luckily I had planned for this expansion by cutting slots instead
of holes in the tabletop where the outside dowel pins go through
the breadboard and tabletop. The tabletop is also secured to the
base using clips that ride in a groove cut in the stretchers --
as the table expands and contracts, the clips move in and out
of the groove but maintain a good connection between the top
and the base. Notice the fine sheen from the shellac.
To download plans for my bedside table, click on this link: PDF format plans (74 KB). You'll need a PDF viewer to view / print this file.
Bookshelves
![[ bookcase ]](images/bookshelves/close_up.jpg) This is a set
of simple adjustable bookshelves for our office. The case is
dadoed and glued 3/4 inch birch plywood, with an Alasan birch face
frame to hide the plywood edges. The finish is several coats of
orange shellac.
This is a set
of simple adjustable bookshelves for our office. The case is
dadoed and glued 3/4 inch birch plywood, with an Alasan birch face
frame to hide the plywood edges. The finish is several coats of
orange shellac.
If I were to make it again I'd probably make it wider and shorter and reduce the lip at the front of the shelves. The other major issue is that the birch plywood (probably yellow birch) doesn't really match the color or figure in the Alaskan birch I used for the face frames. Alaskan birch has a much more delicate grain, with bright white sapwood and dark brown heartwood. It's also much cheaper than yellow birch since I can get locally produced wood.
First Workbench
![[ workbench ]](images/old_workbench/workbench.jpg) My first
workbench is based on the workbench that appears in Norm Abram's
book The New Yankee Workshop. I used a Veritas bench
screw rather than the one mentioned in Norm's book, and added a
set of drawers underneath the top. I also used 1/4 inch plywood
for the top instead of hardboard because the remainder of the
plywood could be used for drawer bottoms. Finally, I added a
front vise built from Pony pipe clamps inserted into the front
of the workbench. My workbench is finished using Watco's Natural
Danish Oil (an oil and varnish mixture) and paste wax on the top
and sides.
My first
workbench is based on the workbench that appears in Norm Abram's
book The New Yankee Workshop. I used a Veritas bench
screw rather than the one mentioned in Norm's book, and added a
set of drawers underneath the top. I also used 1/4 inch plywood
for the top instead of hardboard because the remainder of the
plywood could be used for drawer bottoms. Finally, I added a
front vise built from Pony pipe clamps inserted into the front
of the workbench. My workbench is finished using Watco's Natural
Danish Oil (an oil and varnish mixture) and paste wax on the top
and sides.
In the photo above you can see my workbench, with a nice piece of purpleheart in the front vise. On the bench are two Steve Knight planes a chunk of white oak that I hope to make into a plane, and a chiseling mallet I made from Alaskan birch.
| Display Cabinet | DVD Cabinet | Spring Pole Lathe | Benchtop Spill Plane |
| ABO Shelves | Shaker Sewing Steps | Magazine Cabinet | Krenov-Style Wall Hung Shelves |