![[ Swingley Development ]](../images/title.png)
![[ Jump to Content ]](../images/blank_white.png)
Magazine Cabinet (page 1 of 2)
Here's my progress and some current photos of my magazine cabinet. The most recent of these images were taken on the 31st of March, 2001.
Other Woodworking pages:
| Projects | Plans | Tools | OldTools Archive |
 My magazine cabinet is based on the plans from the 25th anniversary
issue of Fine Woodworking (Issue 146, pages 108-113). After
a visit to the local hardwood dealer (Superior Hardwoods), I decided
to build my magazine cabinet out of red oak.
My magazine cabinet is based on the plans from the 25th anniversary
issue of Fine Woodworking (Issue 146, pages 108-113). After
a visit to the local hardwood dealer (Superior Hardwoods), I decided
to build my magazine cabinet out of red oak.
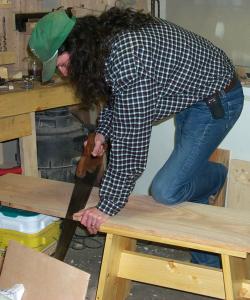
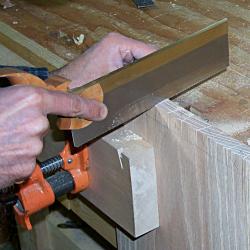
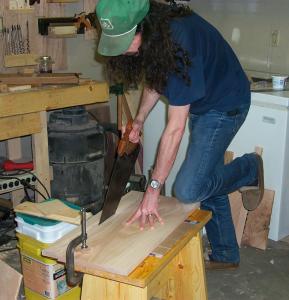 The first step is to cut out the pieces for the carcase.
I used a Disston D-23 cross cut saw with 8 teeth per inch for
the cross cuts, and a H. R. Peace rip saw with 5 1/2 teeth per
inch for the rip cuts. Because I'm new to hand sawing, I made
my measurements 1/8 over so I could plane them down to the final
dimension. Here's my first real use of the sawbench I made.
The first step is to cut out the pieces for the carcase.
I used a Disston D-23 cross cut saw with 8 teeth per inch for
the cross cuts, and a H. R. Peace rip saw with 5 1/2 teeth per
inch for the rip cuts. Because I'm new to hand sawing, I made
my measurements 1/8 over so I could plane them down to the final
dimension. Here's my first real use of the sawbench I made.
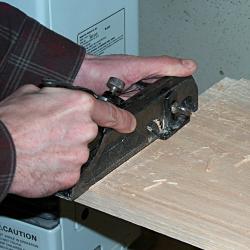
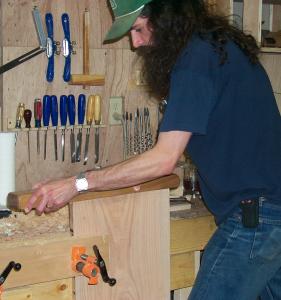 Smoothing all the sawcuts and squaring the edges (shown on the
right) is done with a variety of hand planes, finishing with my
jointer plane -- a
Steve Knight masterpiece.
To keep the wood from splitting out at
the end of the planing stroke, I chisel in at the final depth so
the wood will pop out at the depth I'll need when I'm finished.
Smoothing all the sawcuts and squaring the edges (shown on the
right) is done with a variety of hand planes, finishing with my
jointer plane -- a
Steve Knight masterpiece.
To keep the wood from splitting out at
the end of the planing stroke, I chisel in at the final depth so
the wood will pop out at the depth I'll need when I'm finished.
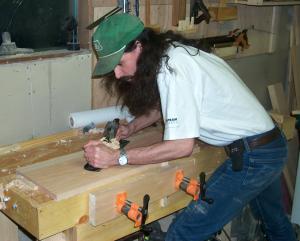 Because the board I bought was very wide (14 inches), it was
a bit curved across it's width. To flatten each board, I ran a
#5 1/2 diagonally across one of the sides, followed by a jointer
plane once I'd gotten the high spots flattened. The first side is
finished by running the jointer with the grain all the way across the
board, followed by my smoothing planes. After the first side is
flat, I marked a line all the way around the edge of the board using
a marking gauge set to the narrowest part of the board. Then I just
plane to the lines, making sure that the jointer takes an even
shaving the full length of the board.
Because the board I bought was very wide (14 inches), it was
a bit curved across it's width. To flatten each board, I ran a
#5 1/2 diagonally across one of the sides, followed by a jointer
plane once I'd gotten the high spots flattened. The first side is
finished by running the jointer with the grain all the way across the
board, followed by my smoothing planes. After the first side is
flat, I marked a line all the way around the edge of the board using
a marking gauge set to the narrowest part of the board. Then I just
plane to the lines, making sure that the jointer takes an even
shaving the full length of the board.
 At this point the wood has been cut to size, squared, flattened
and smoothed -- ready for joining together into the main body
of the cabinet. Along the way while planing the flat surfaces,
the board needs to be checked to make sure it isn't twisted.
A pair of winding sticks that are the same width along their entire
length are placed at the edges of the board. By sighting down the
board such that the rear stick is just above the closer stick,
you can tell if the board is twisted. I mark the high corners
with a pencil and plane away the pencil marks until the board is
no longer twisted. This should be done on the first side you
flatten so the second side can be referenced from the first.
At this point the wood has been cut to size, squared, flattened
and smoothed -- ready for joining together into the main body
of the cabinet. Along the way while planing the flat surfaces,
the board needs to be checked to make sure it isn't twisted.
A pair of winding sticks that are the same width along their entire
length are placed at the edges of the board. By sighting down the
board such that the rear stick is just above the closer stick,
you can tell if the board is twisted. I mark the high corners
with a pencil and plane away the pencil marks until the board is
no longer twisted. This should be done on the first side you
flatten so the second side can be referenced from the first.
 The top of the cabinet is dovetailed into the sides with
through dovetails. For this project I used a ratio of 1:6, and
cut them so the narrow edge of the tails is 3/4". This matches
one of my chisels, and because it is close to the thickness of
the wood, the pins and tails look appropriate. After marking
the pins, I saw them down to the thickness lines with a dovetail
saw (a Lie-Nielsen Independence saw) and chisel out the waste.
Clearly mark the waste side of each pin before sawing and
chiseling -- believe me, you don't want to make *that* mistake!
I also undercut the gaps (meaning I'm chiseling slightly into
the edge of the board rather than directly down to the layout
line on the other side). I do this because it gives me a crisp
line that the matching board can butt against, it's easier to
cut them this way than try to get them perfect, and because the
end grain won't yield a good glue joint anyway.
The top of the cabinet is dovetailed into the sides with
through dovetails. For this project I used a ratio of 1:6, and
cut them so the narrow edge of the tails is 3/4". This matches
one of my chisels, and because it is close to the thickness of
the wood, the pins and tails look appropriate. After marking
the pins, I saw them down to the thickness lines with a dovetail
saw (a Lie-Nielsen Independence saw) and chisel out the waste.
Clearly mark the waste side of each pin before sawing and
chiseling -- believe me, you don't want to make *that* mistake!
I also undercut the gaps (meaning I'm chiseling slightly into
the edge of the board rather than directly down to the layout
line on the other side). I do this because it gives me a crisp
line that the matching board can butt against, it's easier to
cut them this way than try to get them perfect, and because the
end grain won't yield a good glue joint anyway.
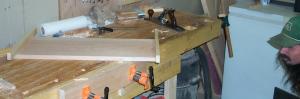
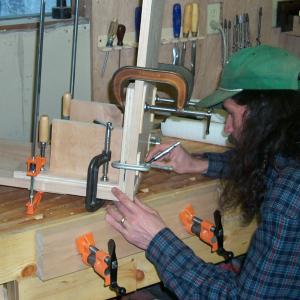
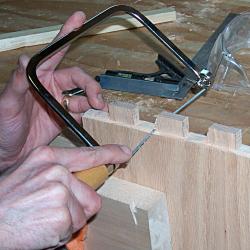
 Once the pins have been cut, mark the positions of the tails
using the board you just cut. The complex assembly shown in the
photograph above is just a clamping system so I can clamp the top
to the sides securely and get accurate lines for cutting the tails.
It's made from 3/4 inch plywood cut at 90 degrees with two longer
and wider strips attached to the edges of the 90 degree piece.
It takes eight clamps (four on each clamping guide), and a lot
of patience to get it set right, but I get better results than
by trying to hold the two boards in the right position.
Once the pins have been cut, mark the positions of the tails
using the board you just cut. The complex assembly shown in the
photograph above is just a clamping system so I can clamp the top
to the sides securely and get accurate lines for cutting the tails.
It's made from 3/4 inch plywood cut at 90 degrees with two longer
and wider strips attached to the edges of the 90 degree piece.
It takes eight clamps (four on each clamping guide), and a lot
of patience to get it set right, but I get better results than
by trying to hold the two boards in the right position.
 From here, the tails are cut inside the lines just marked, most
of the waste removed with a coping saw, and the remainder chopped
out to the line with a chisel. I normally use a wide chisel to
clean up the saw marks on the sides of the tails and pins until
the pieces go together. I don't usually hammer them all the way
together until it's actually time to assemble them with glue.
From here, the tails are cut inside the lines just marked, most
of the waste removed with a coping saw, and the remainder chopped
out to the line with a chisel. I normally use a wide chisel to
clean up the saw marks on the sides of the tails and pins until
the pieces go together. I don't usually hammer them all the way
together until it's actually time to assemble them with glue.
 Next, we need to form the mortise and tenon joints that hold
the bottom of the case to the sides. I used four tenons on the
bottom of each side, and cut the mortises so that the tenons can
accept two 8 degree wedges. This makes the joint very similar
to a dovetail joint because the bottom of each tenon is wider
than the top, holding the bottom firmly to the sides.
Next, we need to form the mortise and tenon joints that hold
the bottom of the case to the sides. I used four tenons on the
bottom of each side, and cut the mortises so that the tenons can
accept two 8 degree wedges. This makes the joint very similar
to a dovetail joint because the bottom of each tenon is wider
than the top, holding the bottom firmly to the sides.
 The first step is to form the tenons on the bottom of each
shelf. I used a rabbet plane (Stanley #78) to form a long rabbet
on each side. The final thickness of the tenon was about 3/8
of and inch. Make sure that this dimension matches one of your
chisels. After forming the long tenon, cut the sides of each
tenon with a dovetail saw, and remove the waste using a coping
saw and chisel.
The first step is to form the tenons on the bottom of each
shelf. I used a rabbet plane (Stanley #78) to form a long rabbet
on each side. The final thickness of the tenon was about 3/8
of and inch. Make sure that this dimension matches one of your
chisels. After forming the long tenon, cut the sides of each
tenon with a dovetail saw, and remove the waste using a coping
saw and chisel.
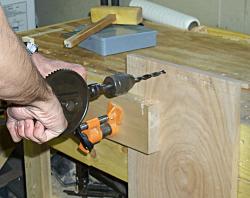 Using the tenons, mark the top of the bottom piece. I used
a breast drill (on my hip) to drill out most of the waste for
the mortises, and then cleaned up the edges with a set of chisels.
A brace would have been a better tool, but my #5 auger bit doesn't
pull itself into the oak well enough. Also, it would have been
better to initially cut the bottom piece too long, and trim it to
the correct size after the mortises have been chopped. All the
pounding at the very edge of the board can easily blow out the
edge of the mortises and ruin the entire board.
Using the tenons, mark the top of the bottom piece. I used
a breast drill (on my hip) to drill out most of the waste for
the mortises, and then cleaned up the edges with a set of chisels.
A brace would have been a better tool, but my #5 auger bit doesn't
pull itself into the oak well enough. Also, it would have been
better to initially cut the bottom piece too long, and trim it to
the correct size after the mortises have been chopped. All the
pounding at the very edge of the board can easily blow out the
edge of the mortises and ruin the entire board.
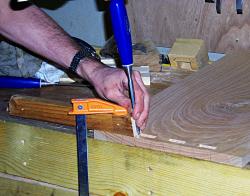 After the square mortises have been cut, flip the bottom
board so you're working with the bottom side, and enlarge the
sides of the mortise to the 8 degrees used for the tenon wedges.
I used my miter box to cut a guide block at the correct angle to
direct the chisel.
After the square mortises have been cut, flip the bottom
board so you're working with the bottom side, and enlarge the
sides of the mortise to the 8 degrees used for the tenon wedges.
I used my miter box to cut a guide block at the correct angle to
direct the chisel.
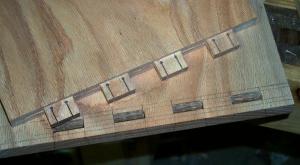 This point is as good as any to drill two small holes in each
tenon, and cut a kerf from the top of the tenon down to the holes.
These kerfs, and the relief hole at the base of the tenon, are where
the wedges will be inserted to lock the bottom to the sides.
This point is as good as any to drill two small holes in each
tenon, and cut a kerf from the top of the tenon down to the holes.
These kerfs, and the relief hole at the base of the tenon, are where
the wedges will be inserted to lock the bottom to the sides.